In this tutorial I'll walk you through how I made the helmet for Arcane Green Lantern from Infinite Crisis, as commissioned by Chris. It's important to note this was a major learning experience! Do not follow this tutorial as a guide of "what to do" so much as a guide of "what can work but could also use some serious improvement."
Materials
Sculpt
- Pink insulation foam
- Scrap wood
- Iron pipe
- Screws
- Metal plate thing for the pipe to screw into
- MDF
- Wood glue
- Hot glue
- Evercoat Rage Gold
- Filler Primer
- Apoxie Sculpt
- Googly Eyes
Mold
- Screws
- Wing-nuts
- MDF
- Smooth-On Silicone
- Smooth-On Plasti-Paste II
- Sonite Wax
- Soap mold
- Clay
Cast
-
Smooth-Cast 65D
Tools
- Jigsaw
- Dremel
- Coping Saw
- Hot glue gun
- Sandpaper (coarse/medium/fine/extra fine)
- Putty knife
This was my first time making a mold and actually casting an object. I understood the high-level pretty well, which is this:
-
Plan the design
-
Carve/create the sculpt out of solid materials
-
Apply silicone to the mold to pick up all of those wonderful details
-
Create a mother mold on top of the silicone to support it during the cast
-
Remove the mold and pour plastic into it to create the final product
I was basing my process off of the work of Harrison Krix at Volpin Props; this is more-or-less how he did his Daft Punk and Skyrim helmets. You'll see as I go how blindly following his steps without understanding his reasoning for his choices bit me in the ass once or twice.
The Design
Harrison Krix builds incredible blueprints off his final products, seen from all angles. I have access to the source art for Arcane Green Lantern, working at Turbine, so I had a designer get some images of the helmet from all 6 sides (top, bottom, front, back, left, right). Fenix then made some blueprints in Illustrator and sized them to pictures we took of Chris' head. I printed these out at FedEx Office.
Hindsight: It wasn't until much later that I started noticing that the size was wrong on these. I'm not sure if it was the pictures taken of the asset, the fact that the proportions on the asset don't match Chris' proportions, or something else. I ended up having to make some modifications on the fly while creating the sculpt that should have been spotted during the planning phase, and even still the helmet is slightly too large.
The Sculpt
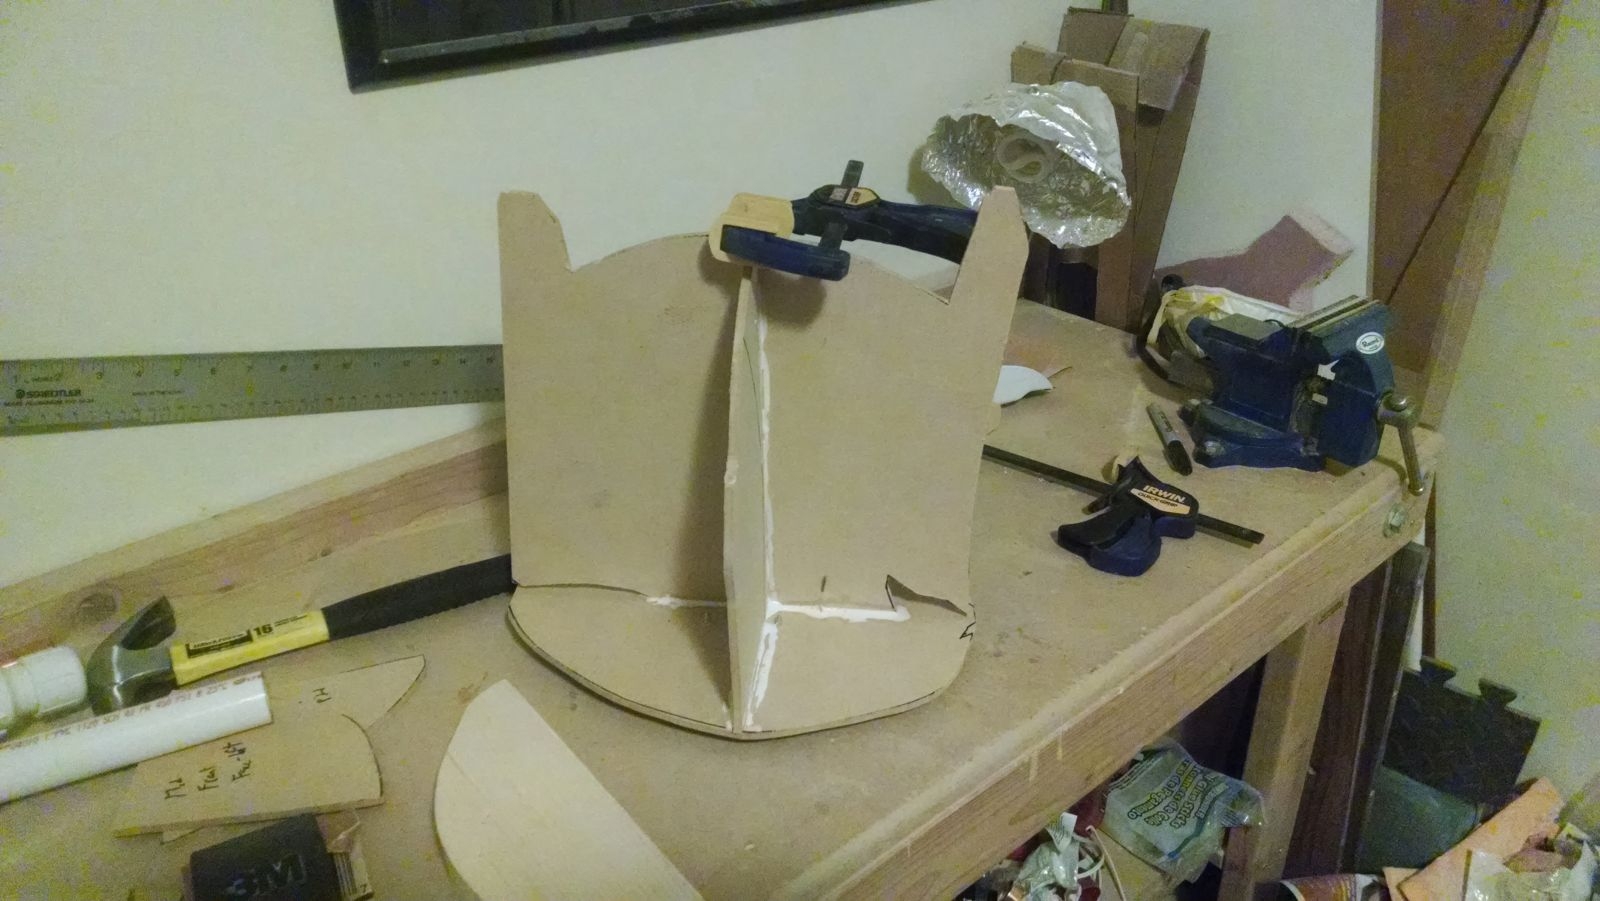 Once I had the patterns I used them to cut out a framework for my sculpt from MDF; a base, a width-wise piece (cut in two), a length-wise piece, and a mid-level piece (cut in four). I used a combination of glue and nails to cobble this frame together. The frame was screwed onto a metal plate which was then threaded onto a pipe which was threaded into another metal plate screwed to a plank of scrap wood as a base. This way it would stand up on its own.
Hindsight: When I was several steps farther into making my sculpt I went back and re-read the Volpin Props tutorials. He had cut slits into his framework so that they would slide into each other. When I saw that I facepalmed, because that would have been way easier and more stable.
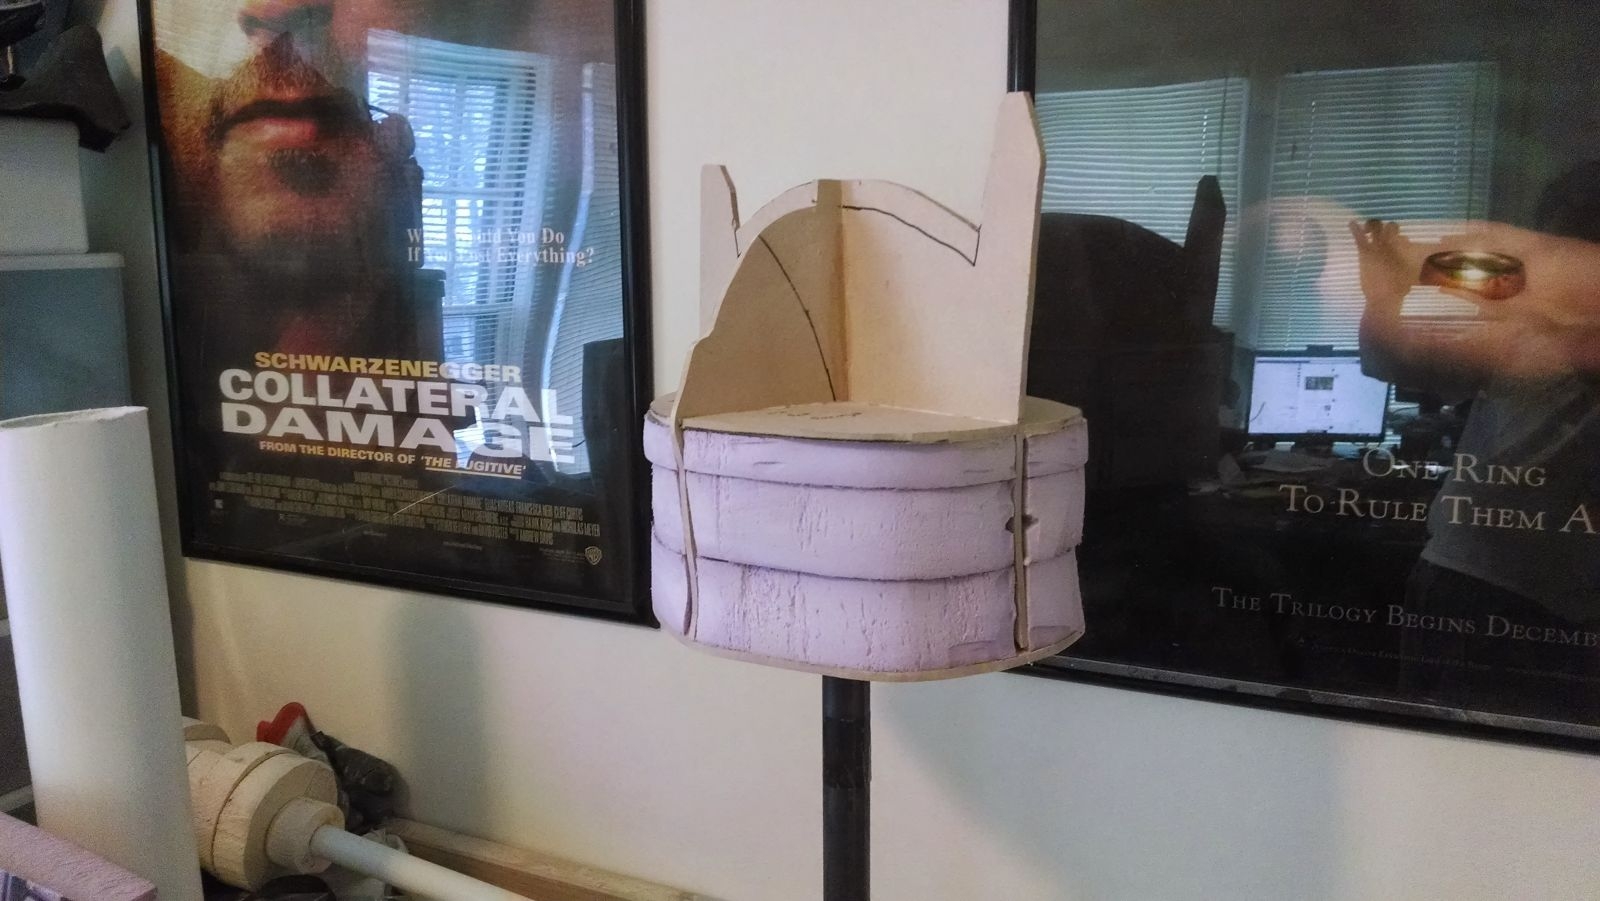 When I had the frame built I started filling it in with pink insulation foam. I cut this down using my coping saw and further shaped it using a coarse sanding head on my dremel. I wasn't too worried about getting this step perfect, since I knew I'd be hitting it up with some filler after.
Hindsight: When I was attaching the foam to the frame and itself I used hot glue. I've used hot glue on pink insulation foam in the past; it will make it stick, but it also can melt it away. Not only that, but when I was carving away the foam with the dremel I ruined many sanding heads by hitting patches of hot glue that then gummed up the head. I am absolutely certain there is a better glue to use than hot glue here; wood glue would probably work, though it takes a lot longer to set than hot glue.
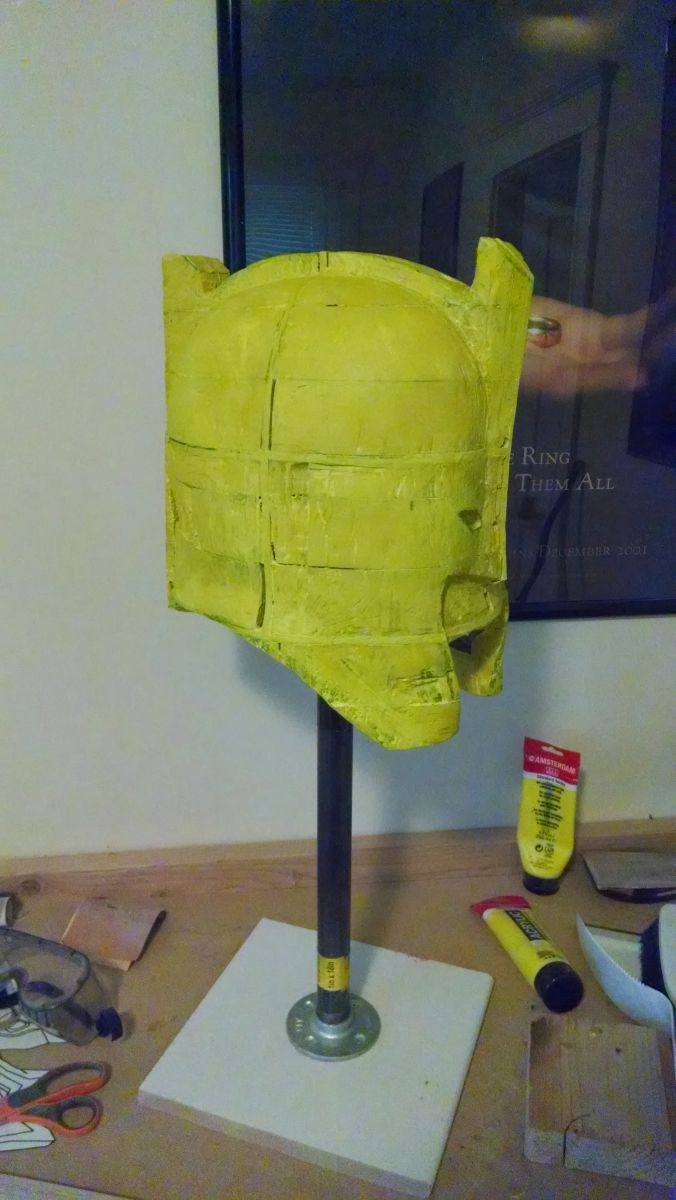 I had several points during carving where I realized the shape wasn't quite where I wanted it. This would lead to attaching extra foam to the bottom so that I had more material to carve away. I found myself taking quite a long time to get the curve on the helmet right, in large part due to my making the framework oversized and also because I was afraid of taking too much off. The latter reason, at least, is a healthy fear to have. I also carved out the mouth and the eye-holes, but all of the detail work I was leaving for the apoxie sculpt pass. For the eyes I made them bigger than the blueprint called for, because I wanted Chris to be able to see out of the helmet. I thought I was finished at one point then started comparing the sculpt to the concept art and in-game model (as opposed to my blueprints) and realized the points at the front and rear of the helmet were WAY too tall, and chopped off the top half of those. With the foam carved I put a layer of acrylic paint on it to protect it from the filler.
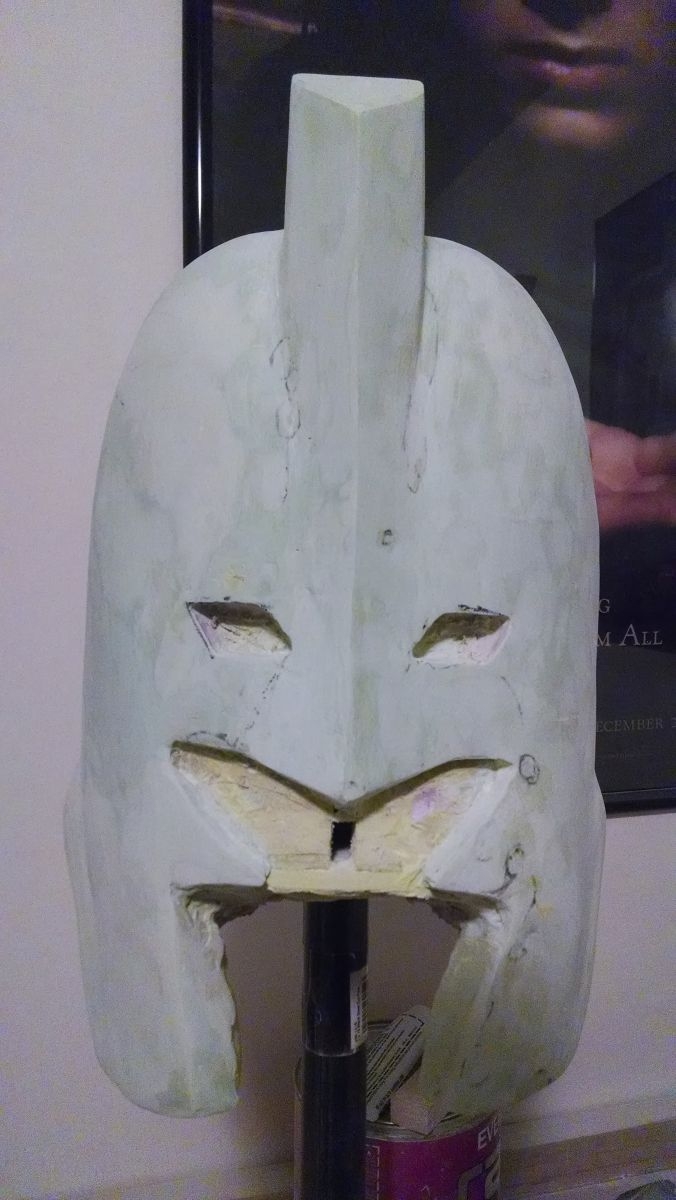 The next step was to lather filler onto the insulation foam. This stuff is kind of noxious, so be sure to wear a respirator. I tried using a brush to apply the filler on my first go, but quickly realized this wasn't going to work. I picked up a putty knife and a Batman placemat to act as a mixing surface and had much better luck. I had a few really lopsided areas of my sculpt that needed a lot of filler, and some areas that were tricky to get the filler applied to because of corners. I alternated applying filler and sanding it down (first with medium, then with fine sandpaper) until I really started to get it where I wanted it. Sanding corners was tricky, and I never did quite get them as nice as the other parts.
Hindsight: One problem I had when working with the filler was that I kept using too much of the hardening agent, cutting my work time far shorter than it should be. By the time I was done I think I was getting the ratios correct, but it definitely led to wasted supplies.
Once I was done adding the filler (and sanding, and adding, and sanding, etc.), cursing myself out for not doing a better job on the foam layer, it was time to add the filler primer. This was just a basic spray-on primer designed especially for filler. I applied a couple of coats of that, and sanded it down with extra fine sandpaper. Be sure you've worked out all of the imperfections on your filler first, since the primer isn't going to hide those at all.
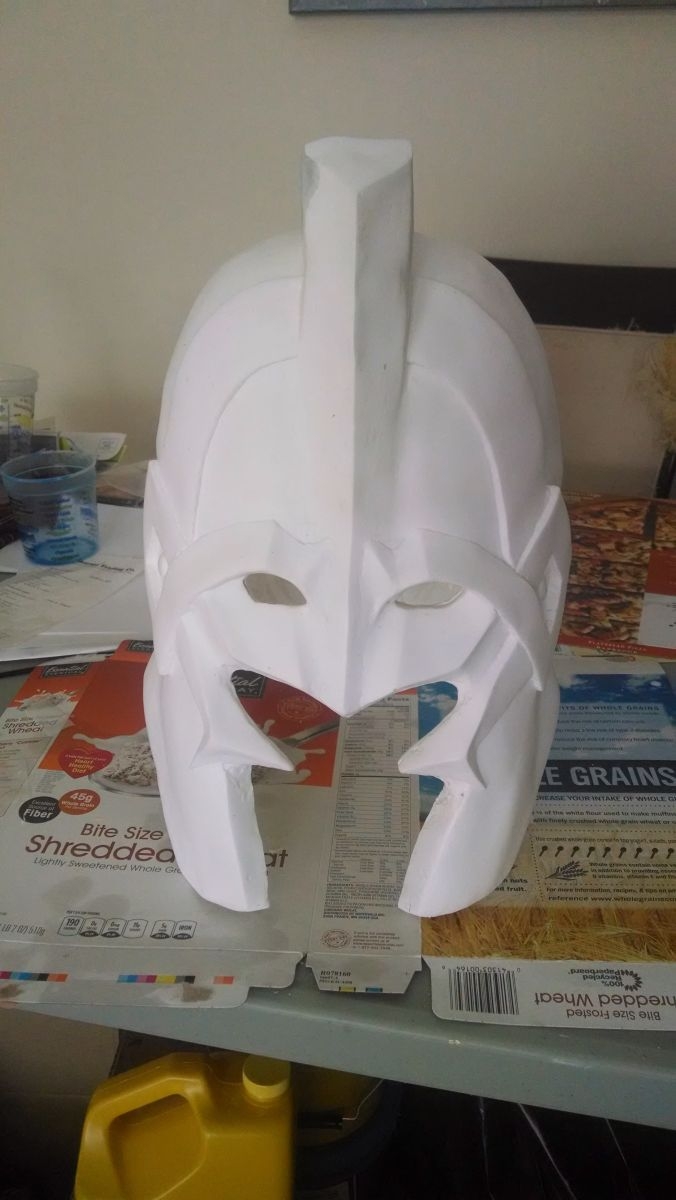
My next step was to add the detail layer. The original plan was to have Fenix do that, but I was so invested in the helmet at this point that I decided I wanted to see it through. It was my first time working with apoxie sculpt, and it's pretty cool. The working time of it is reasonable, though it certainly added a level of stress to not screw it up. That also meant I worked in small sections; I would try and get one area perfect before adding onto it, instead of roughing out the entire thing first. I did one side of the face and then tried to mirror it on the other.
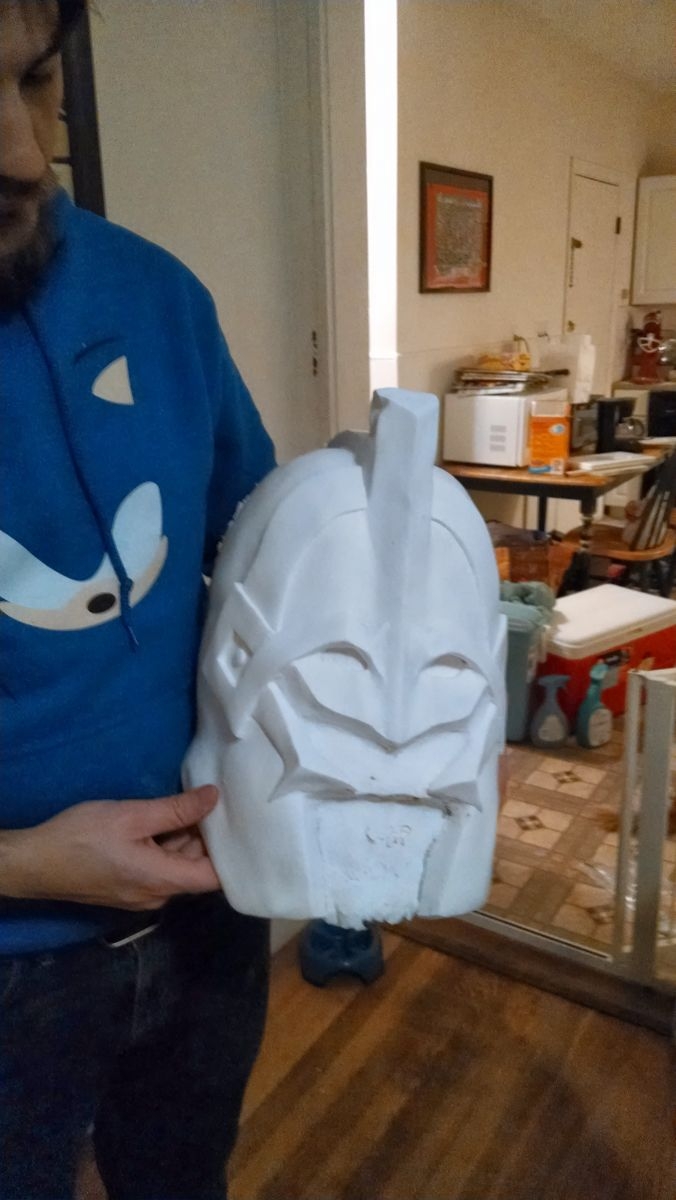
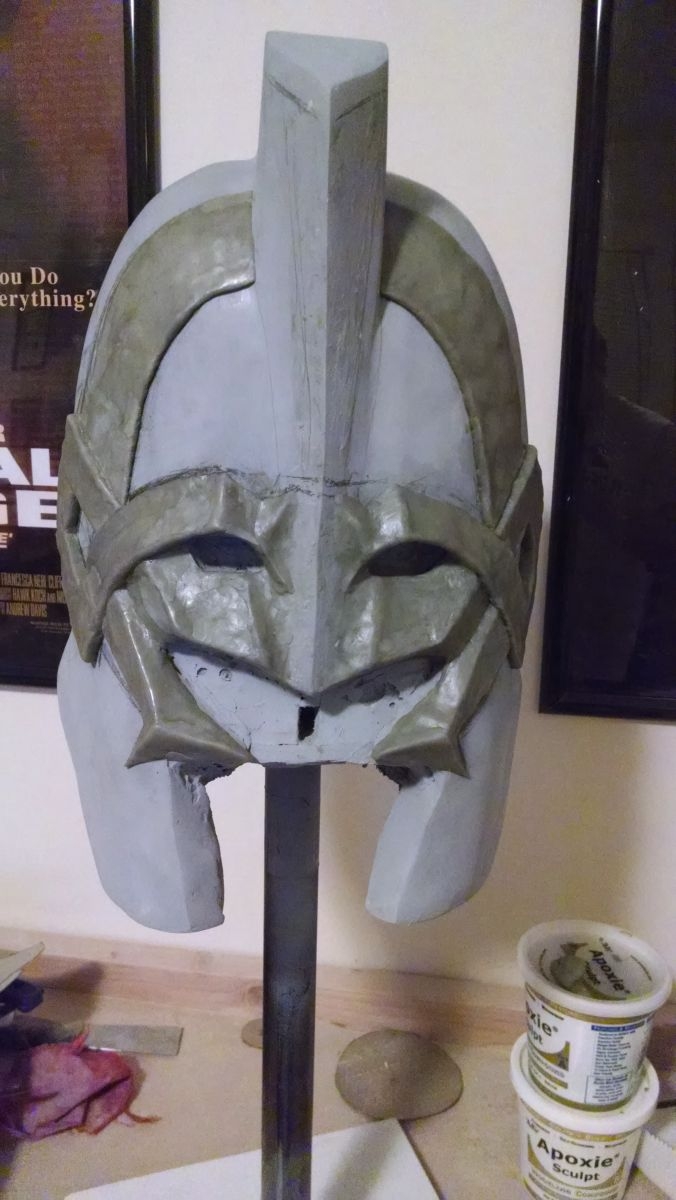 After getting the details roughed out with the apoxie sculpt to the best of my abilities with my hands and basic tools I attacked it with sand paper. I sanded it down like crazy with coarse sandpaper which revealed all of the hills and valleys that didn't belong. I filled in the valleys with more apoxie sculpt and sanded down the hills until it was nice and uniform. I then progressed down to medium, fine, and extra fine sandpaper until it was perfectly smooth to the touch. I compared my product to the concept art and decided it was missing a small bump in some of the detail work on the temple, so I pulled out my trusty googly eyes and glued one on each side. The sculpt was officially ready.
The Mold
Now that I had an object that looked how I wanted my finished helmet to look it was time to create a mold for it. Before I could do that, though, I had to add a whole bunch of clay walls to the sculpt. First I had to add clay all around the bottom. This was to define how thick the lip of the helmet would be (to keep the silicone from going farther). I also filled in some areas where I had been a bit aggressive in my shaping, specifically the mouth and the eyes. The mouth because I probably should have just recessed the foam instead of getting entirely rid of it, and the eyes just to save on silicone.
After building the clay walls on the bottom I had to build the central divider wall. The silicone mold was going to be in two parts (so that it could more easily be removed) and this clay wall forms that seam. The idea is to have the clay wall, apply silicone on one half, then remove the clay wall, add a release agent, and put silicone on the other side. Mimicking Harrison Krix I also added little round indents in the clay wall so that the two sides of the silicone had a way to "lock" together.
Hindsight: The clay did not want to stick to my sculpt. I don't know what the trick is there, but I had a really tough time getting it to stay in place. This resulted in a crooked clay wall (especially on the right-hand-side of the helmet). At the time I figured that would be fine, but that crooked wall caused several problems for me that now make me wish I had taken the time to fix the wall.
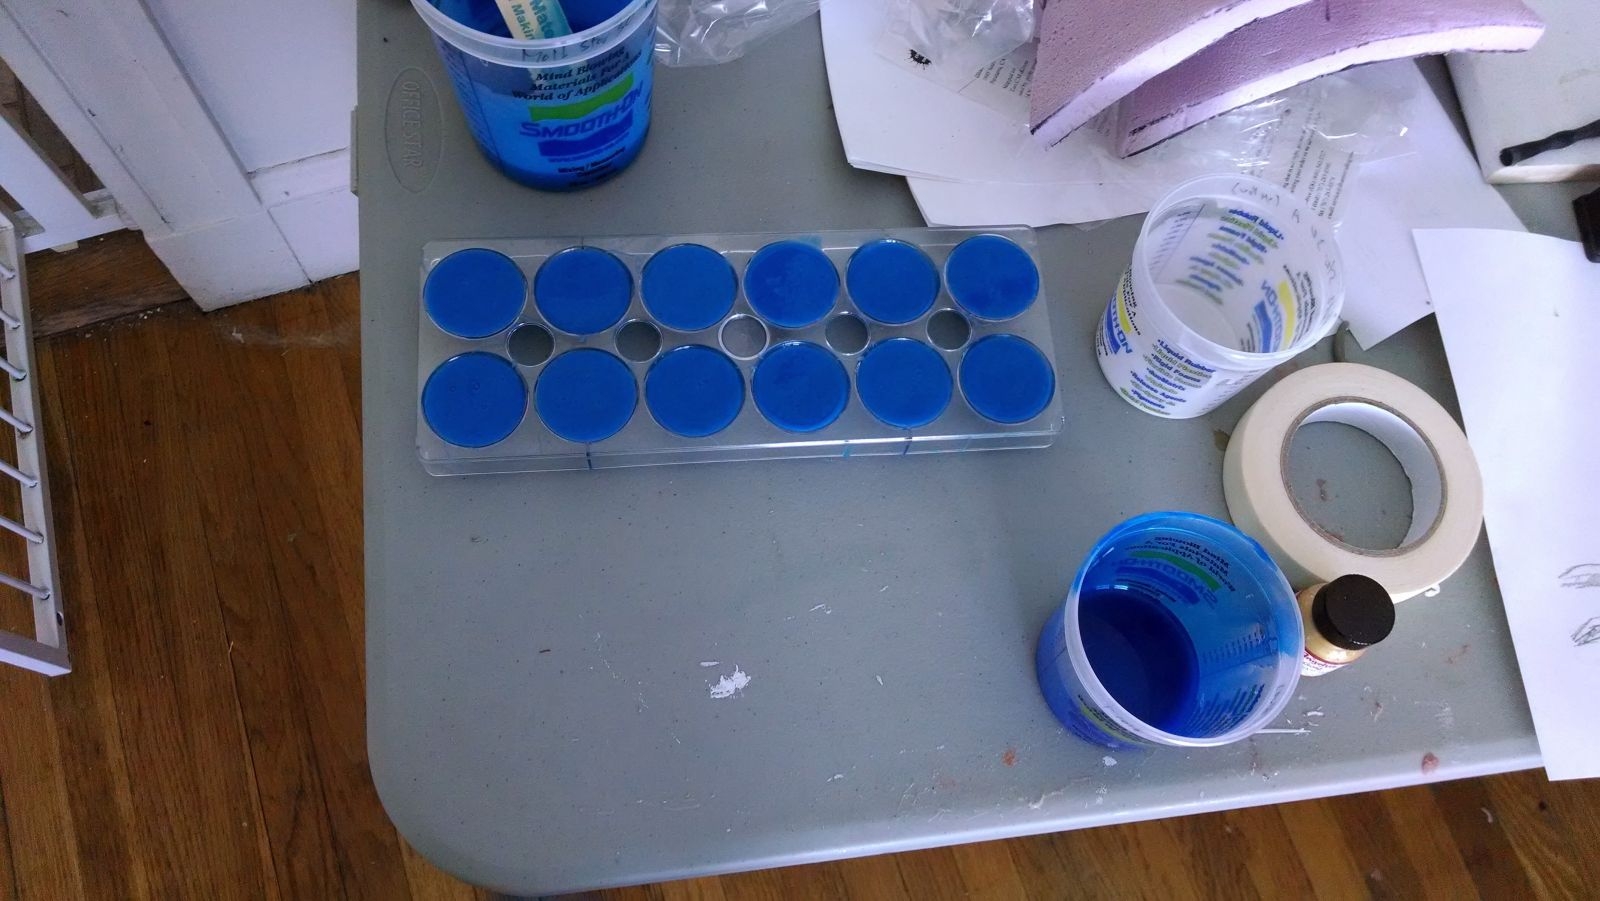 Next up I created the register keys. I had found a soap mold at a flea market which I used; I mixed up some of the silicone, filled the molds, and let it cure. At first I just made one batch (12 keys), but as I was adding the silicone to the main sculpt I kept having some extra and made a couple of other batches with the excess.
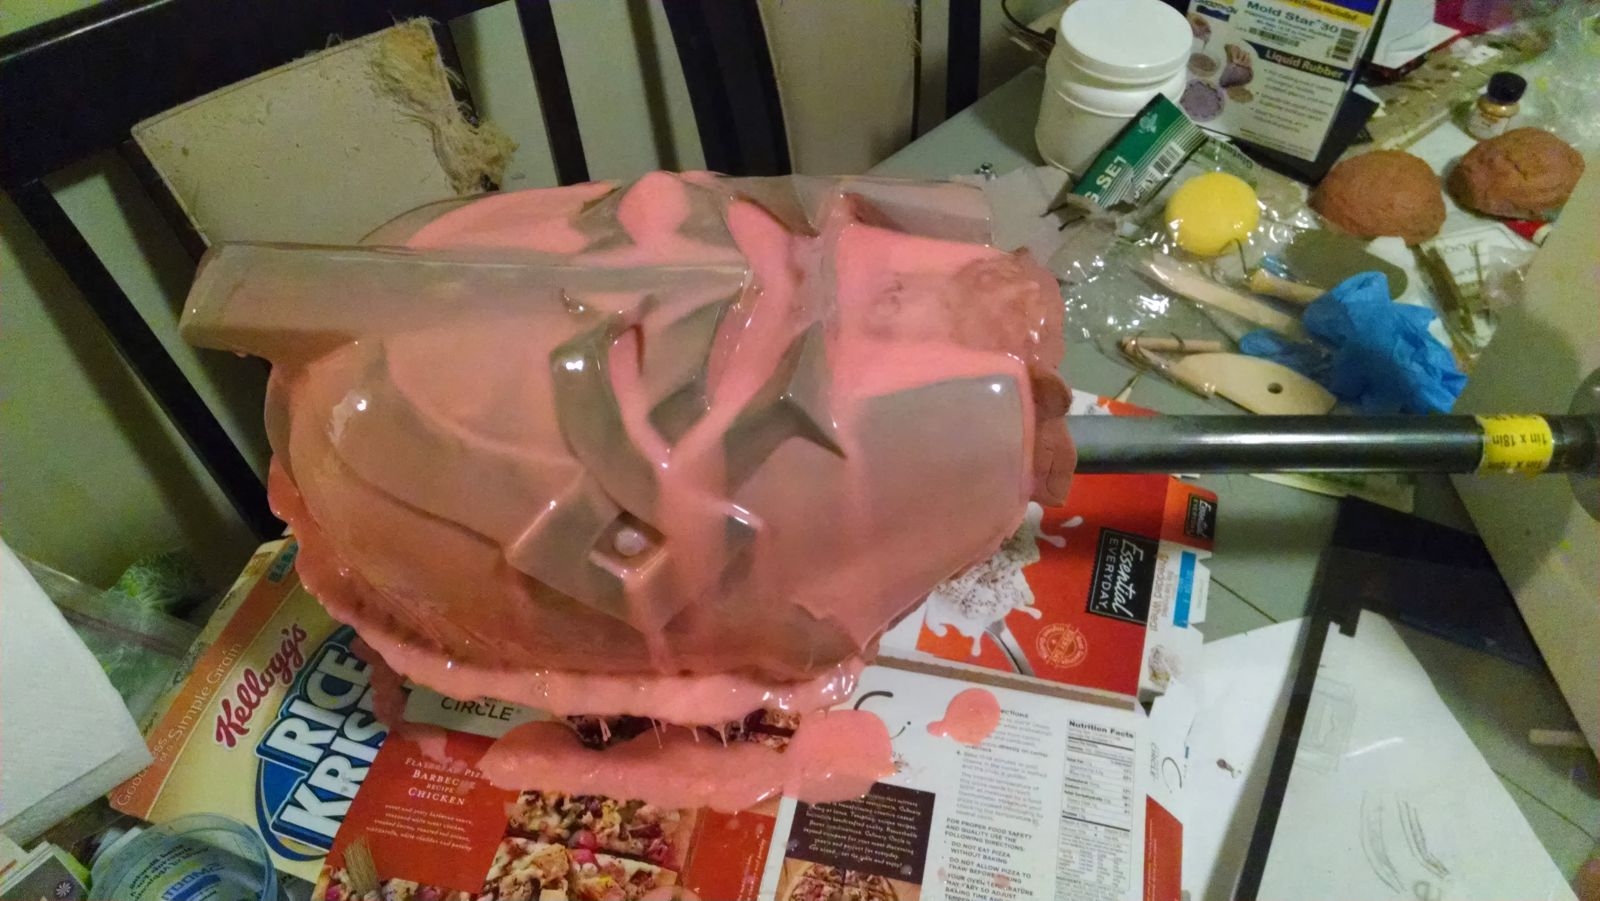 From here things were fairly straightforward. I mixed a batch of silicone and brushed it onto the front half of the helmet. I made sure I coat everything to the best of my ability, including the clay walls. I gave that the necessary time to set, then mixed another batch, this time adding the silicone thickener. This made the silicone basically stay where it was put instead of dripping everywhere. It worked well for building up the second layer (which is more for durability than anything. When I was done brushing on the silicone I pushed the register keys into this layer to make them stick.
Hindsight: On the second coat I probably used too much thickener and/or should have tried to smooth it out a bit more. All of the ripples gave me some trouble later when trying to get the mother mold to line up with the silicone. I also didn't put enough silicone on the central clay wall - it definitely could have been thicker to better support the mother mold.
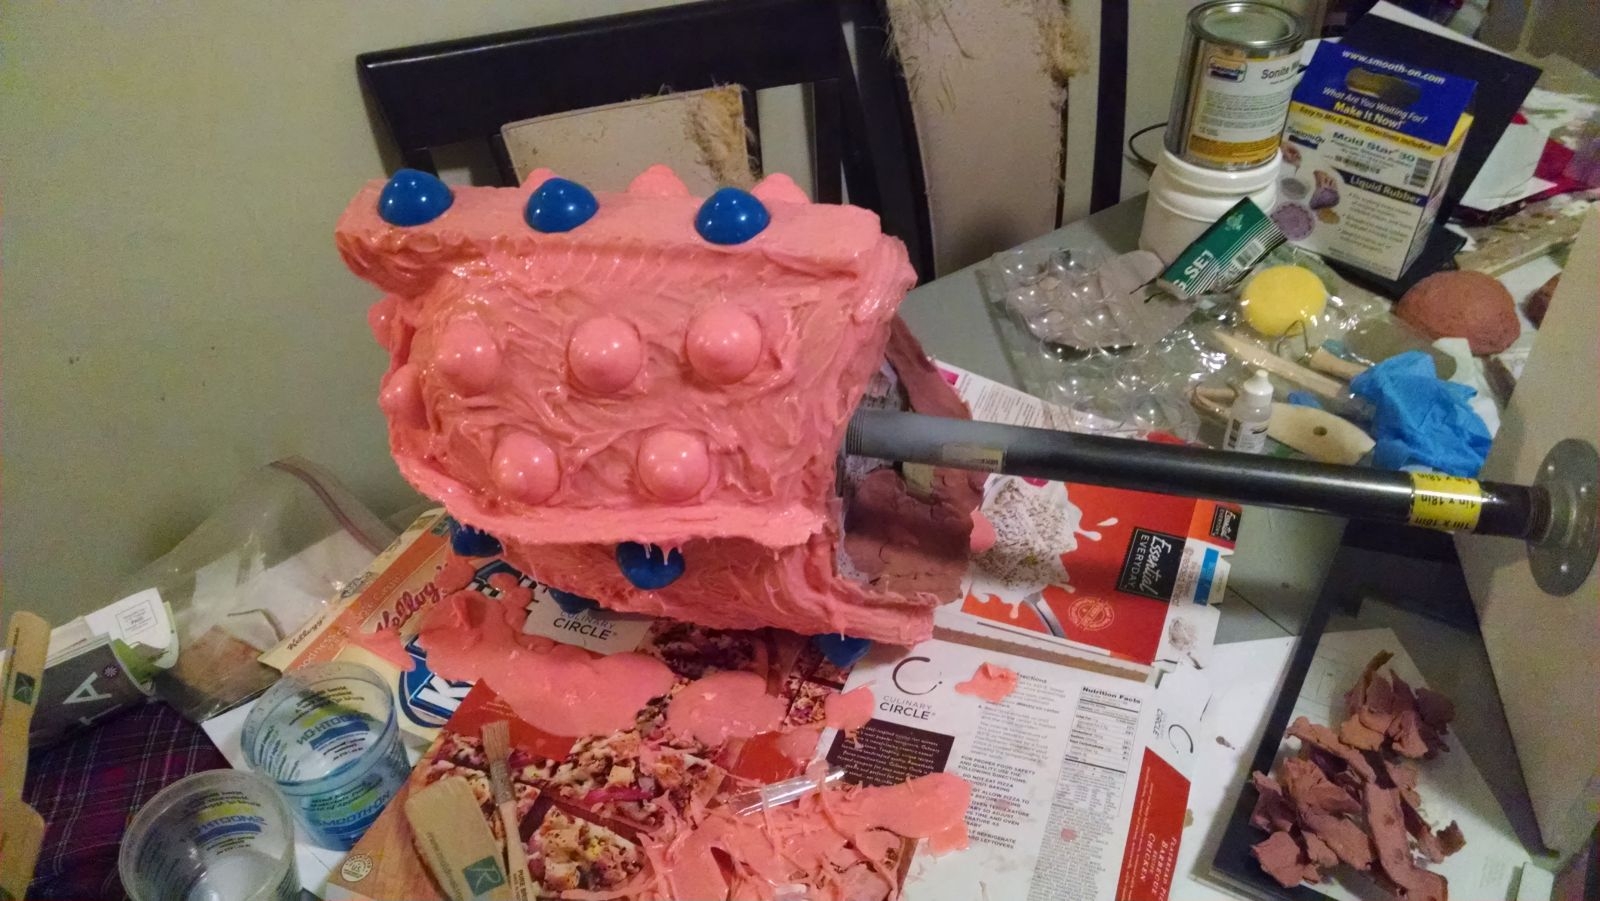 Once the front was cured I flipped it over, removed the middle clay wall, and added the Sonite Wax as a release agent. I brushed the wax all over the section that would touch the back. Once I was confident it wouldn't stick to the front half I added the silicone to the back: a thin coat of silicone for details followed by a thick coat for durability, and register keys plonked onto that.
The Mother Mold
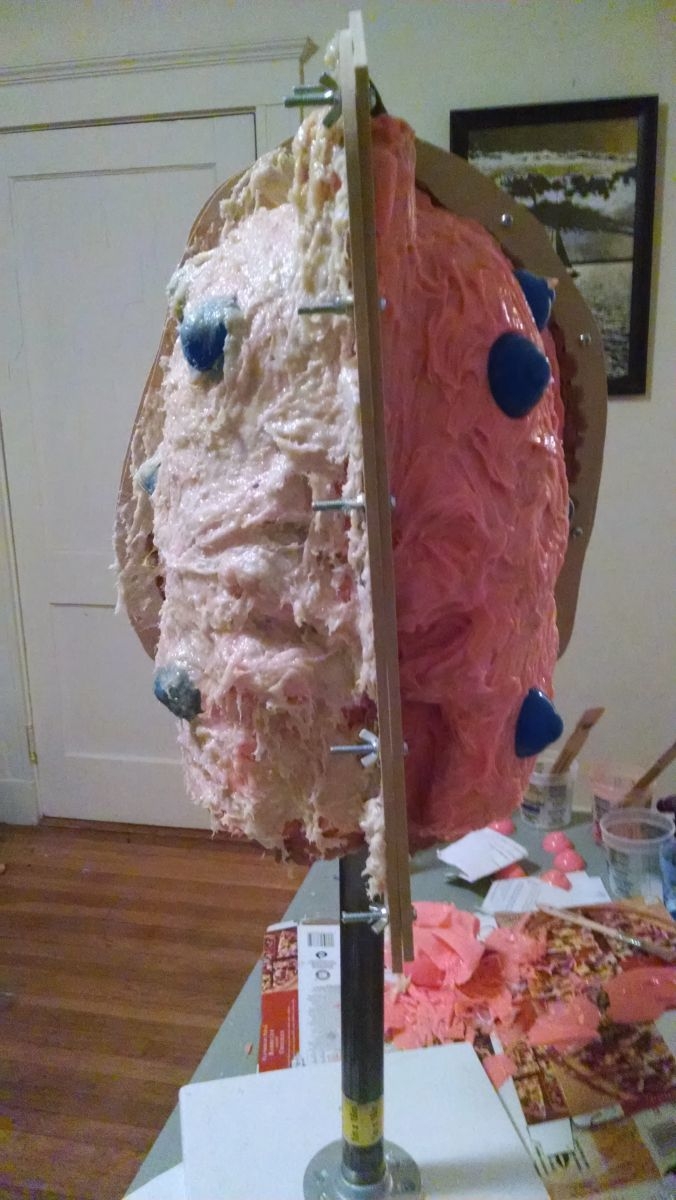
The idea of the mother mold is that the silicone mold is, after being pulled off of the sculpt, floppy. It can't support itself. Thus we build a mother mold to act as its support. Before applying anything, however, I had to build an external framework.
I made a rough pattern out of paper (should have used cardboard) and then transferred that to MDF. I wanted to separate the two halves of the helmet along the same line as the silicone, and then further subdivide the front half into quarters down the middle. To this end I made MDF about 1-inch tall that followed those contours of the helmet, two of each, to act as the dividers between the pieces of the mother mold. These were then drilled out and had screws and wing-nuts hold them together.
Hindsight: I can't stress this enough: I SHOULD HAVE QUARTERED THE BACK HALF AS WELL. This gave me such a pain later that it is, by far, my number one regret in all of this. Due to the posts at the front and back of the helmet, by quartering I could pull the pieces of the mother mold to the sides to remove them. Without quartering the back half I couldn't pull back because the post held it in place, and I couldn't pull up because of the lip on the bottom. Eventually I had to break off the bottom lip, and even then the register keys had a death grip on that mother mold that was REALLY difficult to best.
 Once the dividers were cut out I wanted to get them in place on the helmet, over the silicone mold. My crooked clay wall from earlier, combined with not piling the silicone onto that clay wall, made this harder than it should have been. With the dividers in place I had to fill in the gaps between the dividers and the silicone so that the Plasti-Paste wouldn't leak through and stick to the other side.
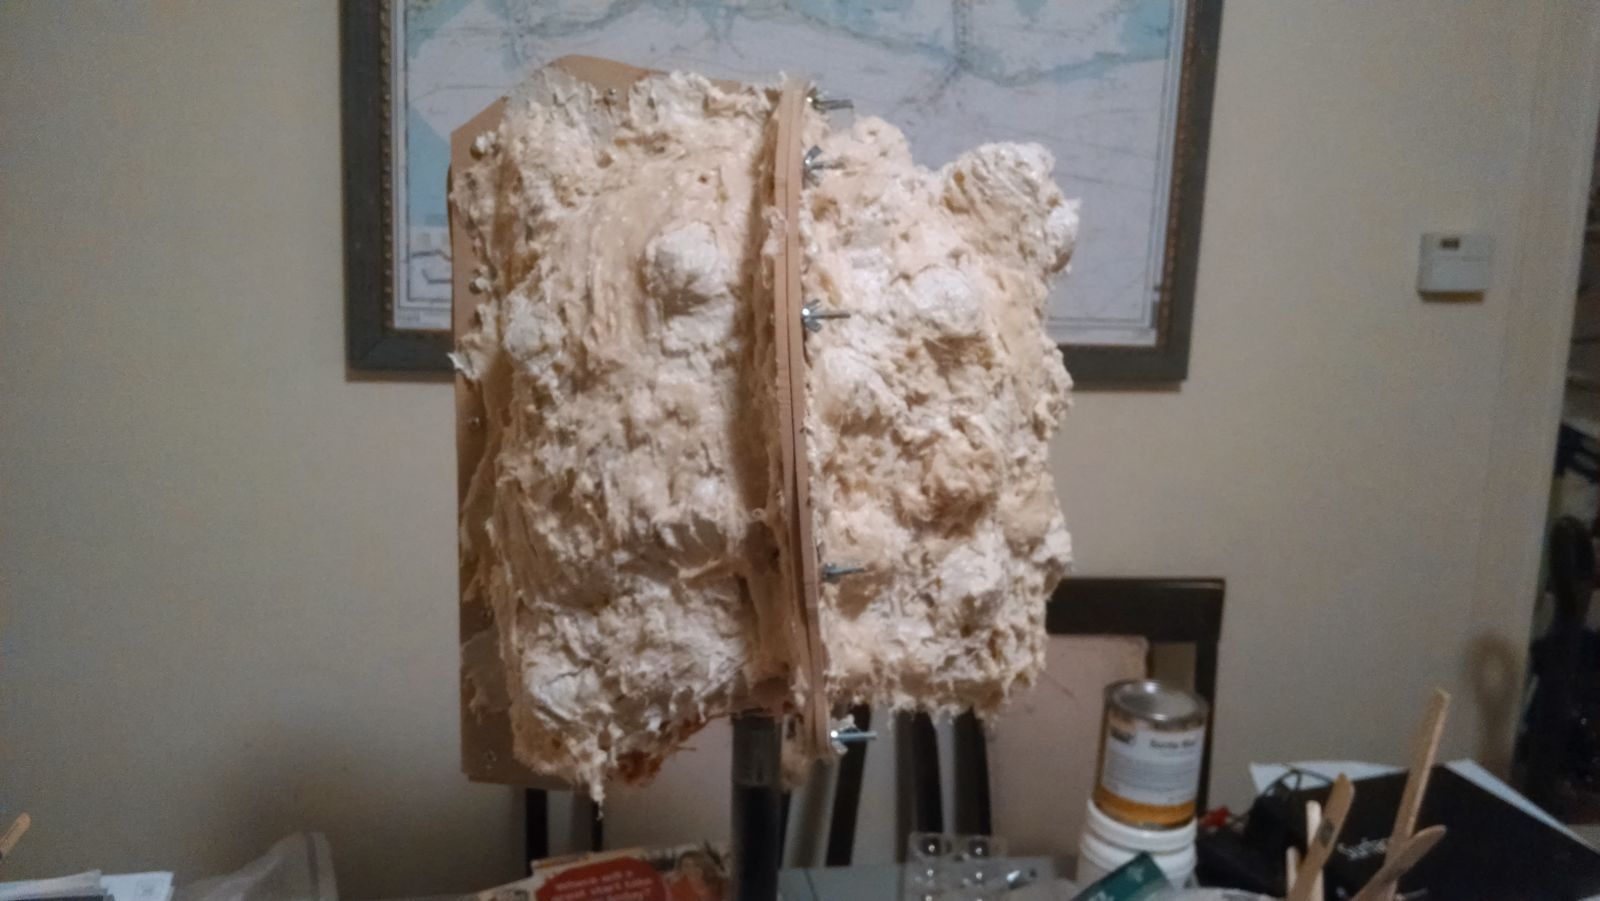
Next up was actually applying the Plasti-Paste. Unlike the silicone which can be pulled out of your mixing container after it has cured with ease, allowing you to reuse the mixing container and mixing sticks, Plasti-Paste will destroy whatever you use for mixing and applying. I had to buy mixing sticks and chip brushes in bulk, and I almost didn't have enough mixing containers.
This stuff is pretty thick, which made it challenging to get into the nooks and crannies, and hard to NOT get it where it shouldn't be (such as on the screws and wing-nuts holding the MDF together). As applying the Plasti-Paste it's important to get it up on the MDF to form a bond between your framework and the mother mold it's supposed to support, while also making sure not to cross over and hit the other side. Be sure to get the entire silicone mold covered thick enough so that it will be strong later (you should not be able to see the silicone through the Plasti-Paste at any point).
Hindsight: The working time for Plasti-Paste isn't very long. Every single batch I made ended up being too large which led to wasted Plasti-Paste hardened at the bottom of a bucket. Also I wish I had been smoothing out the plasti-paste with a spatula or stick or something as I was going. The brushed-on texture combined with drips created a very, very rough surface that wound up cutting my hands up like crazy later.
 After I had added several layers of Plasti-Paste and letting them cure it was time to de-mold the sculpt. I unscrewed by wing nuts and pulled out all of the machine screws. I then used a flathead screwdriver to pry the two front quarters away from each other. They slowly started to give; the left-side popped off first. The right side did not want to let go; after prying at the seam between the front and back eventually it came off. It turns out the Plasti-Paste had found a gap in my clay wall under the MDF seam, fusing the two pieces together.
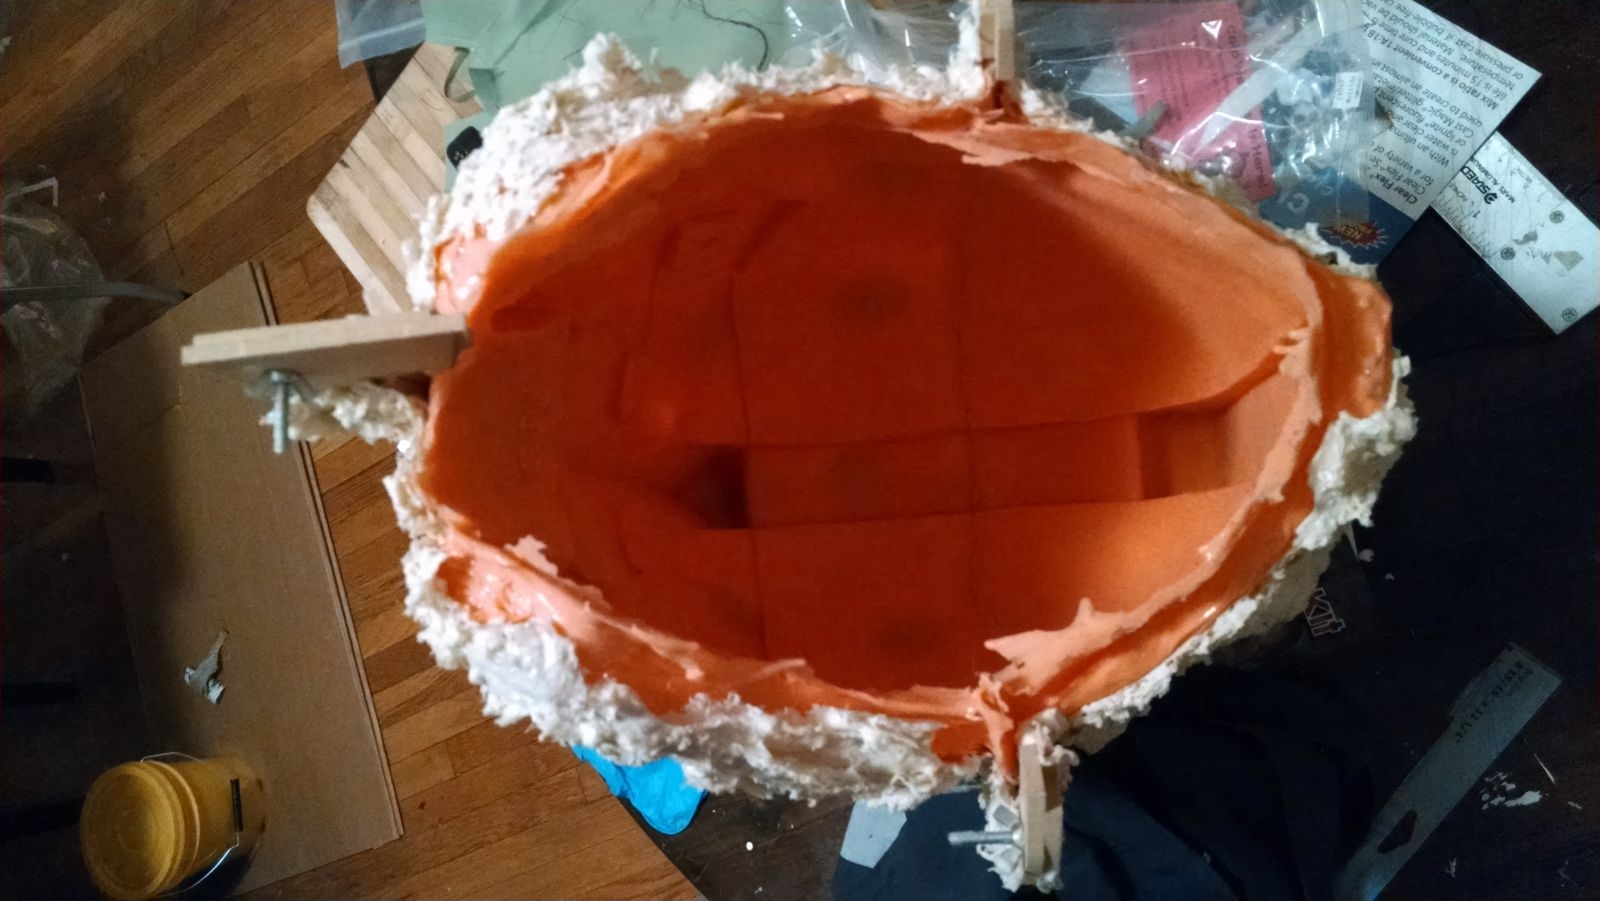
With the mother mold off the front half I tried to pull it off of the back half. I wasn't having any luck, so I decided to remove the silicone mold from the front half. That peeled right off with very little fuss; the Sonite Wax had done its job beautifully along the main seam. Unfortunately, I had apparently put a small hole in the silicone when I was trying to pry the mother mold off with the screwdriver.
With the front half taken care of I returned my efforts to the back half. This is where my previous hindsight comment really bit me in the ass: I should have done rear quarters instead of a rear half. If I had done that it likely would have come right off with no problem; as it was I broke off pieces of the mother mold trying to get it loose. The issue was that I couldn't pull the mold back because of the rear post of the helmet, and I couldn't pull it up because of a combination of the lip on the bottom and the register keys. Even after breaking off the lip on the bottom (partly on accident, then later on purpose) I still couldn't get it off. I ended up destroying the sculpt to get the mold off, spending hours carving out the back half of the sculpt so that I could get a good, distributed grip on the mother mold so that pulling on it wouldn't just snap off the piece I was pulling on. Eventually I got it off by clamping it to my workbench and pulling with all of my strength. With the mother mold finally off I was able to peel off the remaining half of the silicone mold without issue. Once again I had put some holes in the silicone in all of my efforts. I put the silicone mold back on the sculpt (or what remained of it) and dabbed a tiny bit of silicone on the holes to patch them up.
Casting
 With the mold ready to go it was time to make the first cast! The front quarters of the mother mold were reattached with the screws and wing nuts. I then put the silicone mold back into the mother mold, making sure the keys lined up properly. There were several spots that didn't want to sit back into the mother mold properly because of the odd shape of the outside of the silicone mold (this is where smoothing that layer out would have helped). I worked at them for a while to get them resting flat. I then attached the front and back half of the mold with the wing nuts, being careful to have the silicone mold's bumps line up between the two halves. I then worked the entire surface over to make sure it was resting flush against the mother mold.
The actual method of casting I chose was rotocasting by hand with Smooth-Cast 65D. The beauty of 65D is how short its work time and cure time is. You mix it up, pour it into your mold, then spin the mold around so that the plastic liquid coats every surface.
Hindsight: The resin cures very suddenly. It will be sloshing about then all of a sudden it slows WAY down followed by immediately stopping in whatever position it's in. This meant my first coat was really uneven because I wasn't expecting this behavior.
I applied two main coats followed by a couple of smaller touch-up coats on thinner areas. I went and watched an episode of TV and when I came back it was cured. It also changes color as it cures, so while you're applying it the resin is clear, by the time it's cured it's an opaque white. Once it was cured it was time to de-mold!
I had a similar issue as I had when de-molding the sculpt, which was to be expected. The front half came off easily, while the back half didn't want to release at all. It took Fenix and I both, me holding the helmet and Fenix pulling on the mother mold, to get it off. That said we DID get it off, and it took minutes instead of hours, so it wasn't too bad at this point, just an annoyance.
 With the mold off we had a pretty decent-looking helmet! I still had to touch it up, cutting out the eyes and the mouth, sanding some of the edges, and cleaning up the middle seam. Another ramification of my inferior clay wall was the middle seam wasn't as clean as it could have been. Thankfully this was cleaned up with a dremel and some extra fine sandpaper. There was also one spot that was slightly caved in (probably because the silicone wasn't flush with the mother mold in that spot), but I filled this in with wonderflex with the cloth removed (it becomes putty-like in this state!).
With all of the clean-up done all that remained was the painting (and the padding so that it would comfortably fit on Chris' head), but painting is Fenix's domain, so I won't speak to that. All in all, despite it being quite a learning experience, I think the helmet turned out decent. It was time consuming and expensive, so I wouldn't recommend this method for everyone, but I might use it again in the future.